Home Blog Page 3

Tennis API

1

I published a tennis API on https://market.mashape.com/f-sm-jorquera/tennis-database.

This API has methods to query all tennis matches on the ATP since 1968,  along with players and qualifications. Filtering, sorting and pagination of the results are suported.

Example request:


curl --get --include 'https://f-sm-jorquera-tennis-database-v1.p.mashape.com/v1/atp_qualification_challenge' \
  -H 'X-Mashape-Key: {my-api-key}' \
  -H 'Accept: application/json'
[
{
    "id": 1,
    "tourney_id": "1968-580",
    "tourney_name": "Australian Chps.",
    "surface": "Grass",
    "draw_size": 64,
    "tourney_level": "G",
    "tourney_date": "1968-01-19",
    "match_num": 2,
    "winner_id": 109803,
    "winner_seed": 0,
    "winner_entry": "",
    "winner_name": "John Brown",
    "winner_hand": "R",
    "winner_ht": 0,
    "winner_ioc": "AUS",
    "winner_age": "27.5209",
    "winner_rank": 0,
    "winner_rank_points": 0,
    "loser_id": 106964,
    "loser_seed": 0,
    "loser_entry": "",
    "loser_name": "Ernie Mccabe",
    "loser_hand": "R",
    "loser_ht": 0,
    "loser_ioc": "AUS",
    "loser_age": "0.0",
    "loser_rank": 0,
    "loser_rank_points": 0,
    "score": "6-3 6-2 6-4",
    "best_of": 5,
    "round": "R64",
    "minutes": 0,
    "winner_ace": "",
    "w_df": 0,
    "w_svpt": 0,
    "w_1stIn": 0,
    "w_1stWon": 0,
    "w_2ndWon": 0,
    "w_SvGms": 0,
    "w_bpSaved": 0,
    "w_bpFaced": 0,
    "l_ace": 0,
    "l_df": 0,
    "l_svpt": 0,
    "l_1stIn": 0,
    "l_1stWon": 0,
    "l_2ndWon": 0,
    "l_SvGms": 0,
    "l_bpSaved": 0,
    "l_bpFaced": 0
  },
...
]


Tablifyme API

0

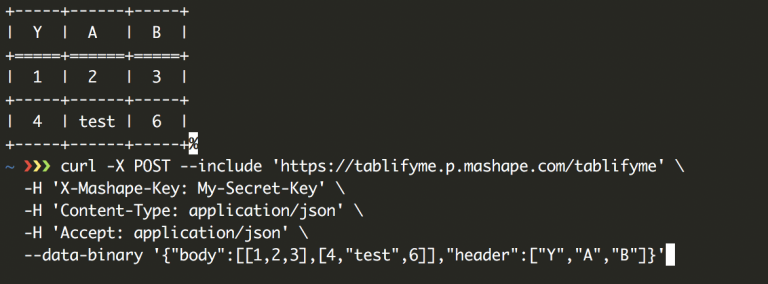
I created an API that creates a text table from a JSON array. Useful to send tables of data over email, Slack or Markdown.

The API is available on Mashape: https://market.mashape.com/f-sm-jorquera/tablifyme

Example:

curl -X POST --include 'https://tablifyme.p.mashape.com/tablifyme' \
-H 'X-Mashape-Key: My-Secret-key' \
-H 'Content-Type: application/json' \
-H 'Accept: application/json' \
--data-binary '{"body":[[1,2,3],[4,"test",6]],"header":["Y","A","B"]}'

Result:

+-----+------+-----+
|  Y  |  A   |  B  |
+=====+======+=====+
|  1  |  2   |  3  |
+-----+------+-----+
|  4  | test |  6  |
+-----+------+-----+


Choropleth: percentage of foreigners by US county

Building maps is very easy with Folium. I got my hands on some data from the US Census, specifically, the foreign born population and total population per US county.

To plot it, first download the CSV from the  2011-2015 American Community Survey 5-Year Estimates.

import os
import folium
import pandas as pd

# Load data
data = pd.read_csv('data.csv')

# Add column with ratio of foreign born vs total pop.
data['ratio_foreign_born_vs_total_population'] = 100 * data['Estimate; Foreign born:'] / data['Estimate; Total:']

# Create map
map_1 = folium.Map(location=[39, -96], zoom_start=4)
high_res_county_geo = os.path.relpath('gz_2010_us_050_00_500k.json') # from http://eric.clst.org/Stuff/USGeoJSON

# Add choropleth layer
map_1.choropleth(
 geo_data=high_res_county_geo,
 name='choropleth',
 data=data,
 columns=['Id', 'ratio_foreign_born_vs_total_population'],
 key_on='properties.GEO_ID',
 fill_color='YlGnBu',
 fill_opacity=0.8,
 line_opacity=0.05,
 legend_name='Percentage Foreigners(%)',
 threshold_scale=[0, 5, 10, 15, 20, 25]
)

folium.LayerControl().add_to(map_1)

# Save as index.html
map_1.save('index.html')

The result:

Saïgon on iPhone 6 iOS 10.2.1

0

Saigon’s Jailbreak is now on beta 2r1, https://iabem97.github.io/saigon_website/ and it promises to jailbreak iPod Touch 6 (10.2.1), iPhone SE (10.2.1), iPhone 6/Plus (10.2.1), iPhone 6s/Plus (10.2.1), iPad Mini 4 (10.2.1) (Not tested), iPad Air 2 (10.2.1). I have an iPhone 6 on 10.2.1 and decided to give it a try.

Download Cydia impactor from http://www.cydiaimpactor.com/

Download Saigon.ipa from https://iabem97.github.io/saigon_website/

Login into your https://appleid.apple.com/account/home and create an app specific password.

Open Cydia Impactor and Drag and drop the Saigon.ipa into it. You will be prompted to enter your email (the same one you used at appleid) and your password, for this one, use the one time password you just create it.

Saigon should now be installed on your phone. Open it and you should see a Jailbreak button. Note that because this is a beta 2, and because the vulnerability that is based on is random, the jailbreak will probably fail a few times before it succeeds.

In my case, despite having a compatible device iPhone 6 on 10.2.1, after installing Saigon I was getting a message with Device Not Compatible. To solve this, I cloned the repo with Saigon’s code and compiled the .ipa myself:

~/D/Code ❯❯❯ git clone git@github.com:iabem97/saigon.git
~/D/Code ❯❯❯ ./compile.sh


compile.sh was failing with some cryptic errors, I found that xcrun –sdk iphoneos –show-sdk-path was using the SDK for iOS 11, instead, I manually run the commands:

~/D/Code ❯❯❯ $(which xcodebuild) clean build CODE_SIGNING_REQUIRED=NO CODE_SIGN_IDENTITY="" -sdk /Applications/Xcode.app/Contents/Developer/Platforms/iPhoneOS.platform/Developer/SDKs/iPhoneOS.sdk -arch arm64

~/D/Code ❯❯❯ mv build/Release-iphoneos/Saigon.app saïgon.app
~/D/Code ❯❯❯ zip -r9 Saïgon.ipa Payload/saïgon.app

I then impacted this IPA on my device, and magically my device was now supported! 🙂 For your convenience, this is the .ipa I created.


Everything that’s wrong with the new iPhone 8

1

Although a heavy Mac Book user and lover, I had been away from Apple phones, I saw them as more restricted and expensive versions of their Android counterparts but that changed recently when my company gave me a corporate iPhone 8 Plus 256Gb.

I’ve used the phone for roughly two weeks and I would like to comment on everything that I came to realize it’s wrong with it.

Lightning Port

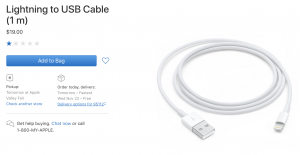
Why in the hell did Apple not substitute their proprietary 1-star lightning cable for the superior USB-C?  This is extremely annoying, the whole industry is moving towards USB-C as a standard, it’s de facto for new Android phones, and contradictory enough, for the new Mac Books. Even legislators such as the European Union are looking into forcing manufacturers that want to sell phones inside the EU to adopt a common charger, to reduce e-waste. But Apple has different plans…

Yep, that’s a solid 1-star average.

Having a lighting cable means that I need to carry two chargers now, one for my Mac (USB-C) and one for my iPhone (lightning), before, with my Android, my Mac charger would suffice, as I could charge both with it.

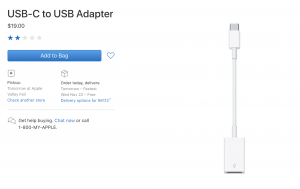
Also, connecting my Mac and iPhone out of the box is now impossible. You are forced to buy a USB-C to USB extension for your Mac.

Hey, at least this one is 2-stars!

Earbuds

I was actually excited before receiving the iPhone 8, I thought I’ll have some of those Bluetooth earpods that everybody seems to love, or at least they seem to carry around with impunity. So there I am, opening the iPhone 8 Plus, a 1000$+ phone in California, when I discover the uncomfortable truth.

Apple has not included the Bluetooth earpods, instead, they have included wired earbuds. But it get’s even worse, because of the lack of a jack connector, the earbuds are lighting too, which means that you can only use them on your phone. Now, if you travel with your laptop and phone, you have to bring two sets of earpods. And yes, to add to the inconsistency, the Mac Book Pro latest model does have a jack connector.

Those will not work anywhere else, not even on your Mac.

At least two things that they could have done to remedy the situation, first, if I am paying more than 1K$ for a phone that doesn’t have a jack, don’t nickel and dime me for extra Bluetooth earbuds, include them “for free”. Otherwise, put a USB-C connector on the iPhone, and include wired earbuds, that at least work on my computer and phone.

The Design

Supposedly Apple was at least good at this one, but I am starting the hesitate. The iPhone 8 design is almost an exact copy of it’s much older brother iPhone 6, and time is starting to show, those huge bezels at the top and bottom are not cool anymore, the home button, even if maintained, could have been squeezed as some Androids have done to increase screen real estate, or even placed behind.

The design is starting to show it’s age.

The glass back is cool but is a fingerprint magnet, and dropping it is a liability. Haptic feedback and force touch are in my opinion underutilized features, I barely use them, and including them makes for a thicker phone.

Overall, it feels like Apple didn’t put much time or effort into this one. They were focused on the iPhone X that got all the media attention, and for the iPhone 8 they basically took the 7 and put in a slightly better processor and a higher price tag. For the foreseeable future, I will stick to Android.


Install matplotlib basemap on virtualenv

6

I am using Python3.6 and MacOS 10.13.2(Beta) but should work with similar setups.

First create and activate your virtual environment, by default mine is created on top of Python3.6.

~ ❯❯❯ mkvirtualenv basemap-virtualenv
[...]
Installing setuptools, pip, wheel...done.
[...]
(basemap-virtualenv) ~ ❯❯❯ cd Desktop
(basemap-virtualenv) ~/Desktop ❯❯❯ curl https://codeload.github.com/matplotlib/basemap/tar.gz/v1.1.0 -o basemap-v1.1.0.tar.gz

Note that I am using the latest version 1.1.0 as of the time of writing this, but you should use the latest available on https://github.com/matplotlib/basemap/releases.

Let’s start the installation

(basemap-virtualenv) ~/Desktop ❯❯❯ tar -xvf basemap-v1.1.0.tar.gz
(basemap-virtualenv) ~/Desktop ❯❯❯ cd basemap-1.1.0/geos-3.3.3/
(basemap-virtualenv) ~/D/b/geos-3.3.3 ❯❯❯ export GEOS_DIR=/usr/local
(basemap-virtualenv) ~/D/b/geos-3.3.3 ❯❯❯ ./configure --prefix=$GEOS_DIR
(basemap-virtualenv) ~/D/b/geos-3.3.3 ❯❯❯ make; make install

After this geos library is installed, let’s jump onto installing basemap.

(basemap-virtualenv) ~/D/basemap-1.1.0 ❯❯❯ pip install numpy
(basemap-virtualenv) ~/D/basemap-1.1.0 ❯❯❯ pip install pyproj
(basemap-virtualenv) ~/D/basemap-1.1.0 ❯❯❯ pip install pyshp

(basemap-virtualenv) ~/D/basemap-1.1.0 ❯❯❯ python setup.py install
[...]
customize UnixCCompiler
customize UnixCCompiler using build_ext
building '_geoslib' extension
compiling C sources
C compiler: clang -Wno-unused-result -Wsign-compare -Wunreachable-code -fno-common -dynamic -DNDEBUG -g -fwrapv -O3 -Wall -Wstrict-prototypes

compile options: '-I/usr/local/include -I['/Users/myself/.virtualenvs/basemap-virtualenv/lib/python3.6/site-packages/numpy/core/include'] -I/Users/myself/.virtualenvs/basemap-virtualenv/lib/python3.6/site-packages/numpy/core/include -I/usr/local/Cellar/python3/3.6.2/Frameworks/Python.framework/Versions/3.6/include/python3.6m -c'
clang: src/_geoslib.c
zsh:1: no matches found: -I[/Users/myself/.virtualenvs/basemap-virtualenv/lib/python3.6/site-packages/numpy/core/include]
error: Command "clang -Wno-unused-result -Wsign-compare -Wunreachable-code -fno-common -dynamic -DNDEBUG -g -fwrapv -O3 -Wall -Wstrict-prototypes -I/usr/local/include -I['/Users/myself/.virtualenvs/basemap-virtualenv/lib/python3.6/site-packages/numpy/core/include'] -I/Users/myself/.virtualenvs/basemap-virtualenv/lib/python3.6/site-packages/numpy/core/include -I/usr/local/Cellar/python3/3.6.2/Frameworks/Python.framework/Versions/3.6/include/python3.6m -c src/_geoslib.c -o build/temp.macosx-10.12-x86_64-3.6/src/_geoslib.o -MMD -MF build/temp.macosx-10.12-x86_64-3.6/src/_geoslib.o.d" failed with exit status 1

As we can see, the installation out of the box is failing. More specifically, the command

clang -Wno-unused-result -Wsign-compare -Wunreachable-code -fno-common -dynamic -DNDEBUG -g -fwrapv -O3 -Wall -Wstrict-prototypes compile options: '-I/usr/local/include -I['/Users/myself/.virtualenvs/basemap-virtualenv/lib/python3.6/site-packages/numpy/core/include'] ...

The reason lies in a bug on setup.py.  If you read the error, you will see how we are trying to include (-I) a path, but instead, we are passing a python array with a single string inside.  To fix this go to this line:

geos_include_dirs = [os.path.join(GEOS_dir,'include'),inc_dirs]

and change it to:

geos_include_dirs = [os.path.join(GEOS_dir,'include'),inc_dirs[0]]

After that python setup.py install succeeds.

Fendera.com Great affordable WordPress Hosting

Web development stack

I’ve built quite a few websites for clients, friends, family and for myself too in the last few years, some examples are: kunstwinder.com, southcitysmile.com or this very blog. Over time, I’ve polished the tool and techniques, to speed up development, and to increase the quality. At this point, my default and preferred architecture that I recommend to most clients is WordPress + Enfold theme. There are powerful reasons behind this choice:

  • WordPress is great. Used by ~27% of the top 10M websites, with a very rich plugin ecosystem, and a visual, intuitive, web-based builder. It’s built on technologies that have passed the test of time: PHP and MySQL. The web interface allows non-technical customers to make tweaks and additions if they are needed after the project is finished.
  • Enfold by Kriesi is one of the most popular WordPress themes out there, and rightfully so. Their intuitive UI makes it straightforward to create visually compelling websites. It comes with dozens of UI elements, including contact forms, google maps, and image sliders, and they are all personalizable.

I think the quality of the examples above proves the point. The clients were extremely happy with the result, and after 2-3 years, the websites still look sleek and responsive.

Hosting

GoDaddy

This is where the headaches begin. I started recommending my first clients to go with GoDaddy, the had made a name for themselves, their support was always available, and their cPanel web management, although far from perfect, got the job done. Finally, about the price, they weren’t so bad at the beginning, and they included some freebies such as Google Ads credit.

GoDaddy has, however, let me down in multiple occasions, so I have progressively pushed them down the list of recommended hosting solutions. My first problem with them was their continuous and unwarned price rises, we were paying no more than 20$ for hosting on the first year, but by the third, the bill was over 100$. They also have a very aggressive up-sale and cross-sale model, constantly and annoyingly suggesting you to buy their SSL certificate for 70$+ or to get a faster hosting (read next paragraph) for another 100$.

Secondly comes the speed, in case you don’t know, speed loading in a website is critical in this world of instant gratification, visitors don’t like waits; according to Kissmetrics, every second that passes before the web loads leads to a 7% decrease in conversions.  GoDaddy, in an attempt to cut costs, makes you share a server with hundreds if not thousands of other websites, reducing speed and responsiveness.

Lastly, they recently changed their support policy, you can’t email and are forced to call them. Their support team is helpful, but unfortunately, they’ve been trained to try and sell you other services…

Getflywheel and WPEngine

These guys understand WordPress hosting: great infrastructure, free SSL certificates (they are free for them, so that makes sense), free backups and flawless user experience. I have tried both services, and really, they are good.

They have only one inconvenient: they are both alarmingly expensive. Their basic plans can set you back at 250$ per year, and it only goes up from there. Unfortunately, most people can’t justify that expense for a website with some dozen visitors per day.

Fendera

This is where fendera.com comes into the game. I’ve developed Fendera using the latest cloud computing technologies: Docker + Kubernetes. Kubernetes is legendary; created by Google as a way to ensure services such as YouTube or Gmail were available 99.99999% of the time and later released to the community. It’s not by chance that it integrates very nicely with Google Cloud, arguably one of the best cloud computing provider.

I wanted to break apart from how GoDaddy did things, and I wanted to stay close to Getflywheel or WPEngine but without forgetting about affordability. Our current plan sets you back at only 60$ per year, yet it comes with free SSL certificates, free weekly backups,  6Gb of SSD and a lot of horsepower under Google Cloud’s hood. Moreover, thanks to Kubernetes we can guarantee great up times SLAs and ensure a safe and reliable service.

If you want to give it a try, please register at fendera.com. Questions or feedback are welcome!

WordPress Enfold YouTube video only displaying link

1

I had a problem recently on a website using WordPress and the Enfold theme. A YouTube video that was initially marked as private, but later updated to public (embeddable) was still only showing the link, and not the actual video player.

A previously private video but later publicly released was still showing as a link on the website.

Other videos however in the same page, where showing properly.

Other videos however, as this one in the image where showing properly.
Other videos, however, as this one in the image where showing properly.

It turns out that from reading here that WordPress does some caching and is not pulling the latest youtube change.

To fix the problem, connect to the MySQL client, and retrieve all pages with an embedded video:

mysql> SELECT * FROM wp_postmeta WHERE meta_key like '%_oembed%';

My results were something like this:

+---------+---------+-----------------------------+------------------------------------------+
| meta_id | post_id | meta_key | meta_value |
+---------+---------+-----------------------------+------------------------------------------+
| 306 | 86 | _oembed_5c3aff6d73f219 | {{unknown}} |
| 336 | 10 | _oembed_39378045d82af3 | {{unknown}} |
| 337 | 10 | _oembed_a26684b605680e | {{unknown}} |
| 354 | 86 | _oembed_af60fe80d2fe16 | <iframe src="yt.com/S3edckDk_qo></iframe>|
| 355 | 86 | _oembed_time_af60fe80d2fe16 | 1503662521 |
| 356 | 10 | _oembed_f4d0e4e5251dea | <iframe src="yt.com/S3edckDk_qo</iframe> |
| 357 | 10 | _oembed_time_f4d0e4e5251dea | 1503662579 |
| 359 | 71 | _oembed_time_a26684b605680e | 1503662615 |
| 385 | 138 | _oembed_f4d0e4e5251dea | <iframe src="yt.com/S3edckDk_qo</iframe> |
| 386 | 138 | _oembed_time_f4d0e4e5251dea | 1503777685 |
| 387 | 138 | _oembed_4c76e997d8b21a | {{unknown}} |
| 389 | 138 | _oembed_268d95c8d907aa | {{unknown}} |
| 391 | 138 | _oembed_time_a26684b605680e | 1505355944 |
+---------+---------+-----------------------------------------------+------------------------+

I tried removing the offending meta_id, by issuing:

mysql> DELETE from wp_postmeta WHERE meta_key like '%_oembed%' and meta_value like '%OeiZNr24o7g%';

However that didn’t work when I refreshed the page, so I decided on the more radical solution:

mysql> DELETE from wp_postmeta WHERE meta_key like '%_oembed%';

That solved all my problems!

Python Stripe Signature Verification Error

1

Building a Django + Stripe integration today I kept hitting the SignatureVerificationError.

According to their webhook’s documentation, they recommend something like this:

@csrf_exempt
def my_webhook_view(request):
  payload = request.body
  sig_header = request.META['HTTP_STRIPE_SIGNATURE']
  event = None

  try:
    event = stripe.Webhook.construct_event(
      payload, sig_header, endpoint_secret
    )
  except ValueError as e:
    # Invalid payload
    return HttpResponse(status=400)
  except stripe.error.SignatureVerificationError as e:
    # Invalid signature
    return HttpResponse(status=400)

  # Do something with event

  return HttpResponse(status=200)

I think would work fine with python2, but in my case the signature being generated never matched the expected signature hence triggering the exception stripe.error.SignatureVerificationError

The solution is to utf8 decode the payload, on line 3, change:

payload = request.body
payload = request.body.decode('utf-8')

That did the trick, hope it can save someone some time.

Repair experience OnePlus 3t

1

After many months of use without a case, I finally managed to crack the screen of my One Plus 3t. I researched online to try a repair on my own, but eventually, and from my previous experiences in which self-repairs don’t end up as nicely as you might think, I decided to reach out to their support team.

The experience was surprisingly pleasant, relatively fast and not as expensive as I had initially estimated. I will describe more or less the process and dates so you get an idea of what to expect.

To start the process you need to submit a ticket through the official Oneplus customer center website,  explaining what repairs your phone needs, in my case my cracked screen. They will reply within a few hours and give you a cost estimate. If you agree to the repairs, they will send you an address in Texas, assuming you are in the US, to where you need to ship the phone.

Once the phone has been received, they will give you a final bill, you need to pay online for the repair bill and then they will proceed with the repairs and mail the phone back to your address. My phone also needed a case replacing, apparently, upon impact, the framing body had been deformed to the point where the new screen wouldn’t fit, so that made the repairs a little more expensive.

Timeline:

  • May 12: opened a ticket with support explaining my screen was cracked
  • May 13: Support responded with an estimate of 62.81$ (not including labor and fees). I agree to the repairs.
  • May 13: Received an email from Acer (who’s in charge of the repairs for One Plus) with mailing instructions.
  • May 15: I mailed my phone using USPS to their repair center in Temple, TX.
  • May 18: I get a message informing that the phone has been received.
  • May 23: I get an email asking me to pay online for the repairs: screen + case: 133.16$. I paid a couple of hours after.
  • May 24: Repairs are completed.
  • May 25: Got a FedEx tracking number.
  • May 27: I get the repaired phone!

One last thing, in my case they did a complete phone reset, even though it wasn’t necessary, so before sending it to repair, I suggest you take off everything that want to preserve that is not backed up already. Also, my phone was rooted and they didn’t care about that.

Finally, the repair looks great, screen+case makes the phone look brand new, and they included a free phone case so that this won’t happen again.