
Introduction
I am unhappy with the router options in the consumer segment. At home, I had a Netgear R7000, allegedly at the top of the consumer-grade routers pyramid.
Even after flashing it with DD-WRT, which multiplies the router’s capabilities, it couldn’t run a VPN client at a decent performance due to its unimpressive CPU (BCM4709A0). Furthermore, I never managed to get the VPN server to work on DD-WRT, and other aspects like DNS filtering felt very limited. Running anything else such as a torrent box on such tiny horsepower is a computational suicide.
I addressed the shortcomings of my setup with an RPi that I used to run a torrent seedbox, a local filesharing server, and a bitcoin node. The limitations of running these on the Pi were also obvious; the Pi didn’t have enough electrical power to drive the USB HDD attached to it. It also missed the mark on the CPU side - it couldn’t transcode video, so no Plex, and overall felt more like a toy and less like an actual production tool.
With all these problems, I started researching solutions, and I’ve developed a setup that I am delighted with and would like to share.
Costs and Materials
This table summarizes all I used, where did I find it, and its price.
[wptb id=766]
The brain
At the core of the system is the server, that is, a computer that will be on 24/7. Ideally, you want something that makes little to no noise, has a small form factor, and modest energy consumption, and at least 2 Gigabit ports.
Some go big and get an actual production server, e.g., a Dell PowerEdge R720. The problem is these are expensive, bulky, and use a lot of watts so that I wouldn’t suggest it.

Instead, I recommend going with a mini-PC. After some research, I ended up buying one from Protecli, in particular, the 6-port one with an Intel 7200U. These boxes are built like rocks and lack mechanical components such as fans or spinning disk hard drives. Mechanical parts are problematic in the long term because they end up breaking, require more power, and make noise.
Intel designed the 7200U for laptops, so it has a small energy footprint, yet it packs a decent punch. Since we will run it on DC as opposed to a battery, we can fully unleash its capabilities.
I ended up spending $660 with a 120 Gbytes of SDD.

Operative System
I wanted to run multiple services inside the box: router, bitcoin node, time machine backup, etc. and ideally, these services would be isolated.
There are a few ways to achieve this isolation in a single physical machine, such as virtual machines or docker images. I ended up going with bare metal Hypervisor, which means you run a small OS to manage Virtual Machines (VMs) that run directly on the hardware, as opposed to running VMs with instruction translation, the latter being much slower.
I tested ESXi from VMware in its free version, but I found bugs and shortcomings all along. I then tested Proxmox, which I found far superior and open source, and I have been happily running it ever since.
Installing Proxmox is quite simple; flash it on a USB thumb drive and boot your protectli with it. It will guide you through the installation process as a standard *nix distribution would. Make sure your box is connected via ethernet to a switch or router so that at the end of the installation process, Proxmox will get a local IP that you can then access from any local computer to manage our server.
Routing - PfSense
The first VM you want to install is the router one. Here the choice is simple: PfSense. Pfsense is a FreeBSD-based OS with 15 years in the making that specializes in networking. It has a fantastic web-UI to manage every single aspect of your network: DHCP, DNS, advertisement blocking, VPN (server and client), etc.
To install it, I followed this guide. In summary, download the latest .iso, and transfer it to a USB thumb drive, from there, upload it to the server via the web UI. Finally, add a CD drive to the VM, and point its content to the iso image.

Make sure you connect two extra ethernet ports while installing pfSense on our server. One should connect to your WAN (Wide Area Network), and that would usually be the ISP’s box that delivers internet to your house. The second one will be your LAN (Local Area Network) port, and you would connect this one directly to your computer, switch, or wireless access point.
PfBlockerNG is a remarkable feature that comes as an optional package for PfSense. In summary, PfBlockerNG blocks DNS requests to specified domains. It can also pull domain lists with a given frequency. These features combined, turn PfBlockerNG into an excellent advertisement blocker at the router level. The rest of my family is less technologically inclined than me, so blocking advertisement that harm sites’ user-friendliness and are sometimes malicious has saved them, and myself, a few headaches.
I don’t want to make a comprehensive list of features in this post. Instead, if you are curious, I suggest playing with it and exploring all it can do incrementally.
Once your Proxmox is up and running, this fantastic guide will help you get pfSense running on it: https://docs.netgate.com/pfsense/en/latest/virtualization/virtualizing-pfsense-with-proxmox.html.

Extra Storage
The internal SSD of 120 Gb is not going to take us too far. I suggest using this faster storage to store VM images and to purchase and connect a large USB HDD drive.
For ~ $100, you can find 5TB drives on popular e-commerce sites. Proxmox can connect to a USB drive and use it as internal storage. You can also mount the drive in different containers so you can effectively share data. A great example of this is downloading a video with the seedbox container that can then be read by the Plex media center container.

Ethernet, WiFi, and cameras
So Pfsense is acting as a router, and we should have two ethernet ports respectively mapped to WAN and LAN. Our Protectli machine has many more empty ethernet ports, so you might be tempted to use those for other LAN devices. That is a bad idea, as the protectli box will have to use the CPU on every data transfer across local devices.
A much better solution is to buy a switch, ideally a Power-over-Ethernet (PoE) one. I went with the Netgear GS108PP, for about ~$120. It has eight ports, and all of them are PoE. PoE means that each of the ethernet wires can deliver 15 watts, enough to power a camera, or WiFi access point.

I have a set of 4 (Reolink) cameras installed around the house, so I ran four ethernet cables from the switch to their different locations. Because I made sure the cameras I bought were PoE, the ethernet cable was enough for the data and power transfer.

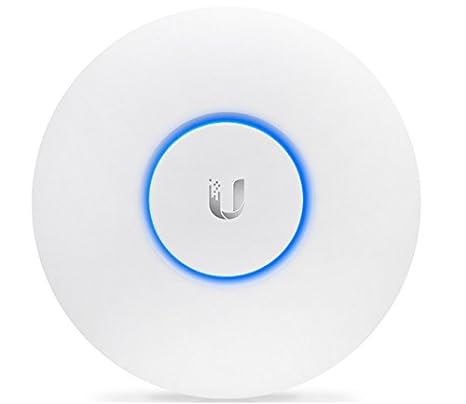
As for the WiFi, I found a Ubiquiti UAP-AC-Pro. A bit pricey, ~ $150, but performant, and also powered by PoE.
Other Services
You are set at this point, PfSense is acting as your router, WiFi served via the AP, and the cameras are connected to and powered by the switch.
While the basics are covered, your machine is capable of much more. To give you an idea, I run the following services: Plex to serve media around my house, Bitcoin node, filesharing, FTP server to store camera recordings, and a small python worker.
You should take this article as a starting point, and adjust this solution to your needs. Enjoy and comment if you like or have questions.
Network Diagram
This diagram represents my home network and lab.
