")
I learned today that a somewhat undocumented feature of Mac OS allows users to backup to any NAS, and not just AirPort or NAS with the Apple Filesystem.
The reasons this is interesting is because, first, AirPort has been discontinued, so it’s no longer an option. Secondly, I’ve tried running a NAS formatted as HFS+ on my Raspberry Pi from guides like this. Unfortunately, in my experience, HFS+ support on Linux is not great, and if the device wasn’t properly unmounted (e.g. a power outage), the filesystem would get corrupted and couldn’t be fixed.
The solution I bring you today is compatible with EXT4, the native filesystem for Raspbian (Debian).
My setup
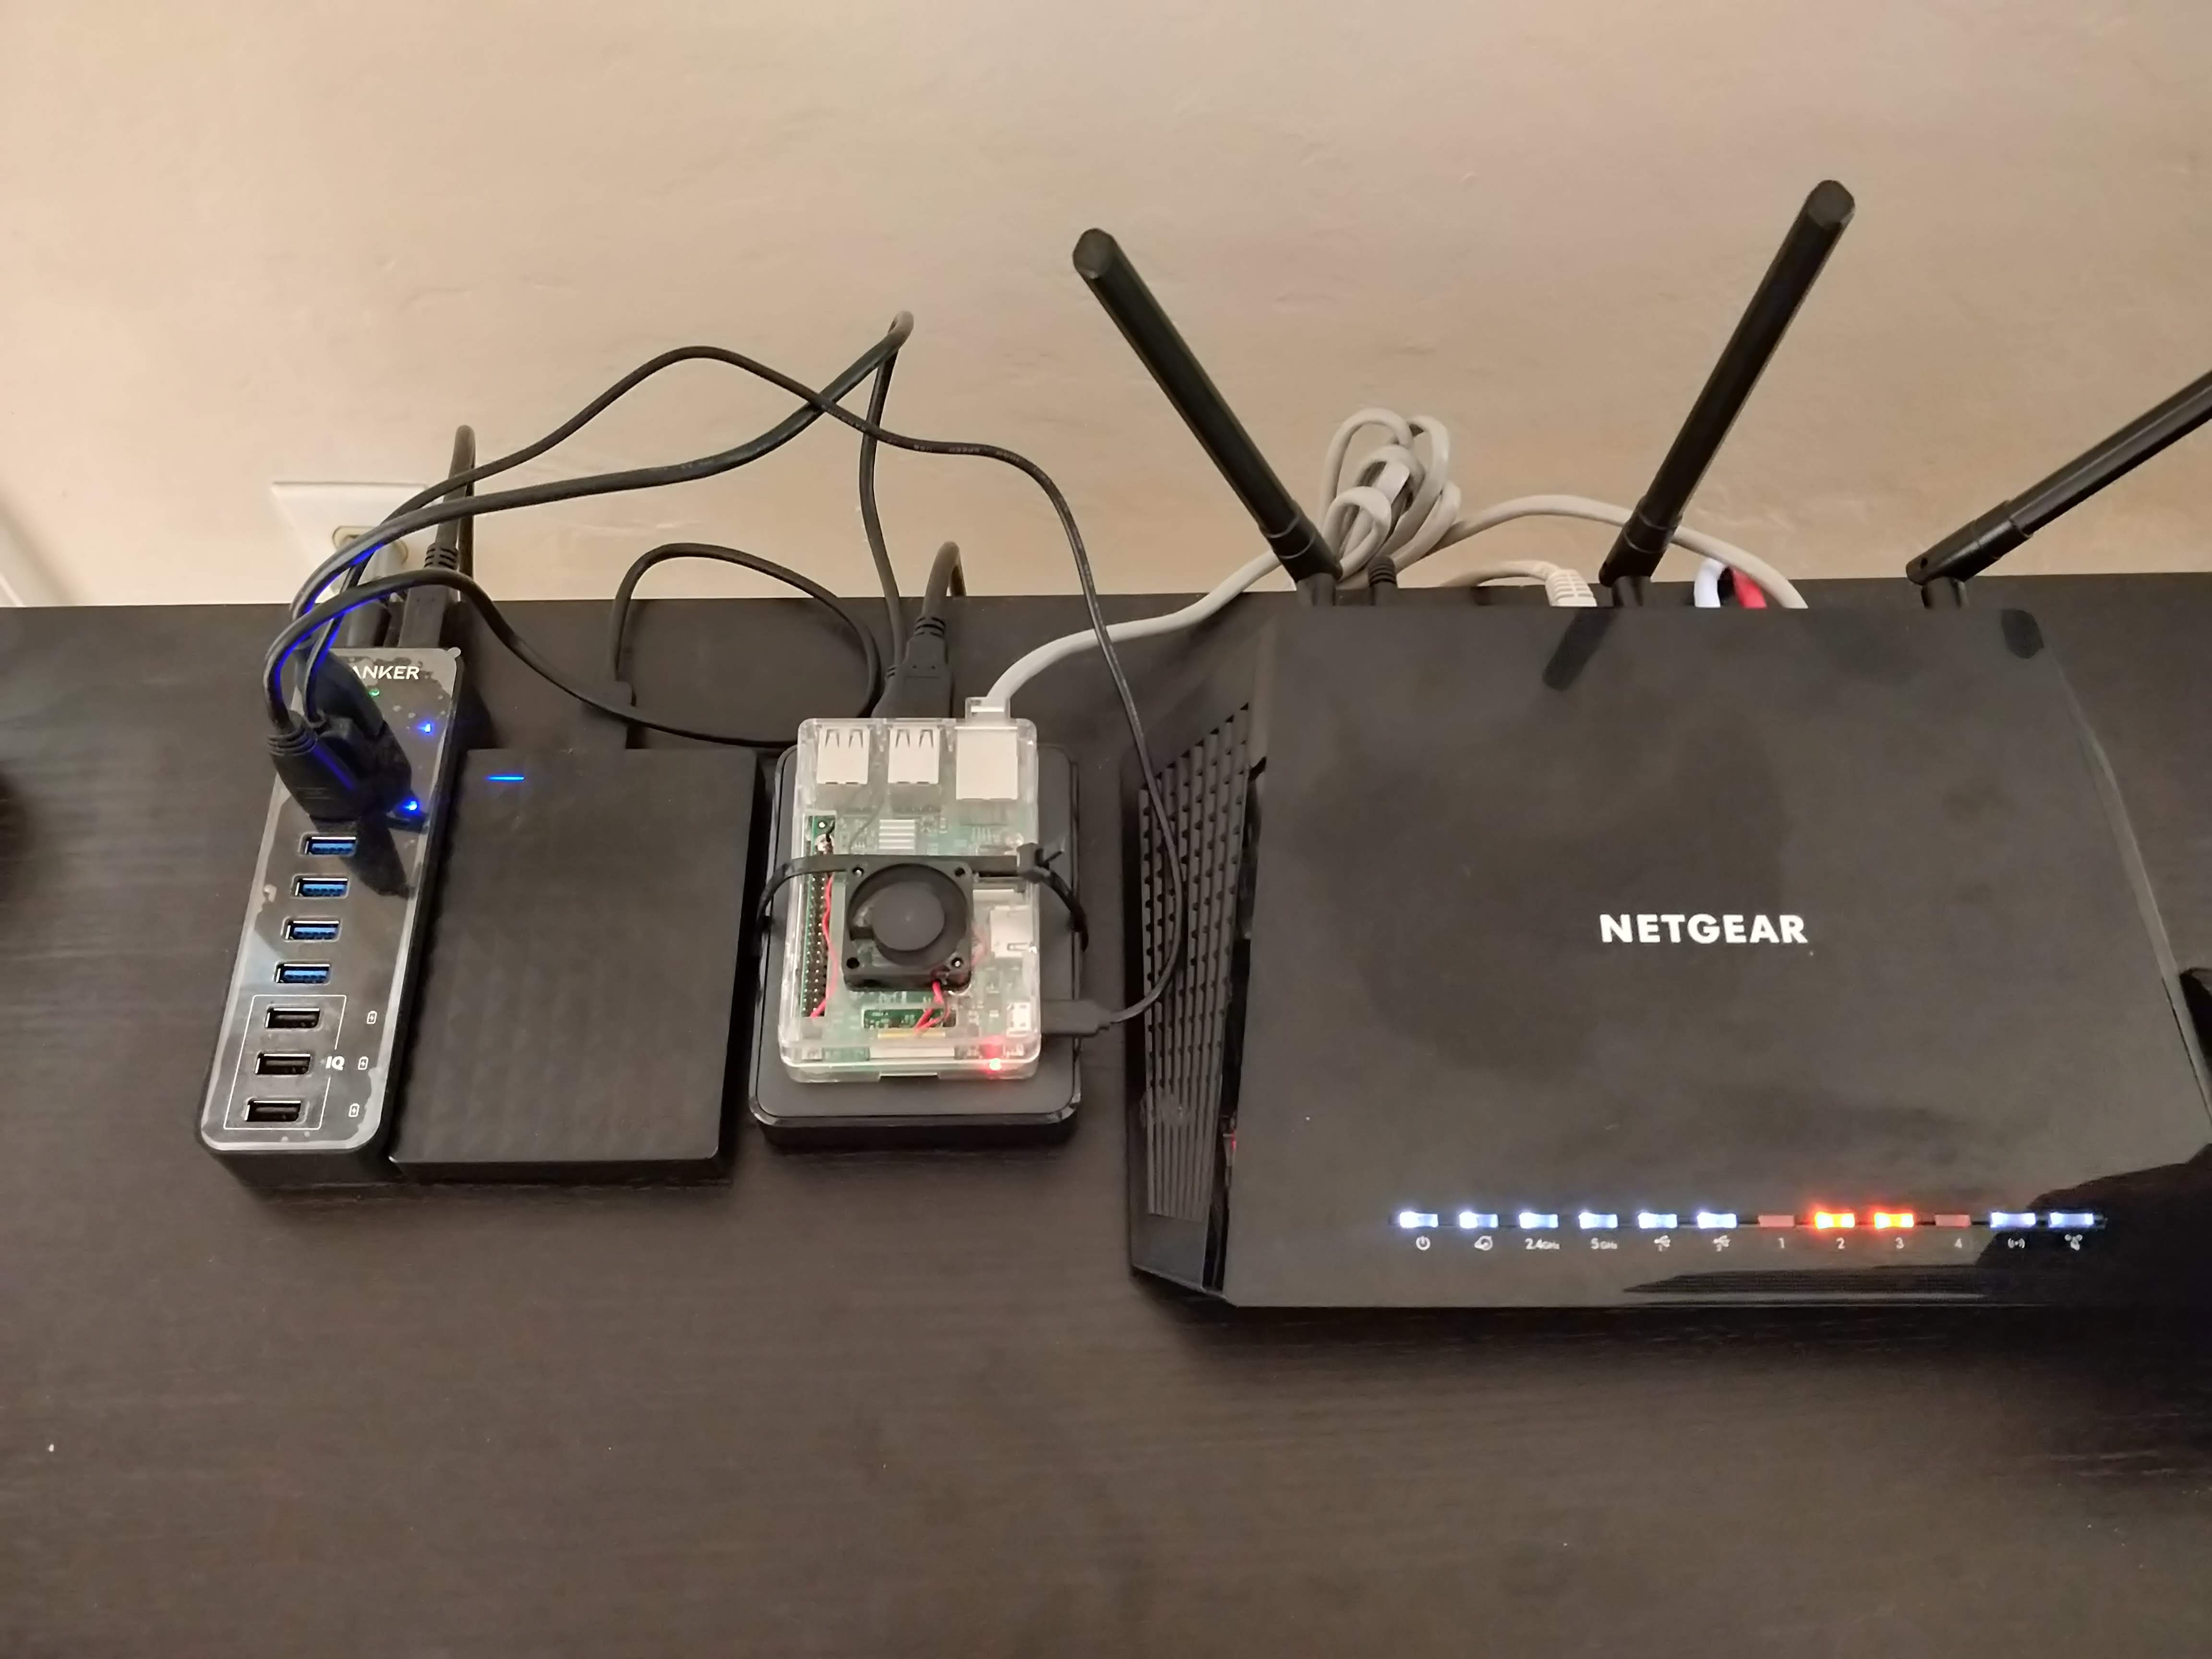
I have a raspberry pi (RPi) that’s connected to my router via Ethernet, and also connected to two 2TB hard drives.
The RPi, among other things, is running Samba, that allows any client on the local network to access any file on those USB drives. Pretty convenient to stream videos, etc.
Turning an EXT4 NAS Time Machine capable
On the Raspberry Pi
I am assuming your USB drive is already mounted and you can access it from another device on the network using samba. If that’s not your case, I can recommend this guide.
With that done, last part is to install Netatalk. Netatalk is included on the standard Raspbian package repository, but the version there is too old; so instead, we are going to compile the latest version available.
First off, install the system dependencies that will let you compile netatalk:
$ sudo apt-get install build-essential libevent-dev libssl-dev libgcrypt11-dev libkrb5-dev libpam0g-dev libwrap0-dev libdb-dev libtdb-dev libmariadbclient-dev avahi-daemon libavahi-client-dev libacl1-dev libldap2-dev libcrack2-dev systemtap-sdt-dev libdbus-1-dev libdbus-glib-1-dev libglib2.0-dev libio-socket-inet6-perl tracker libtracker-sparql-1.0-dev libtracker-miner-1.0-dev
Then, head out to http://netatalk.sourceforge.net/, and check their latest version. As of the time of writing this 3.1.11. Let’s download it, compile and install it.
Open your terminal, and issue the commands:
$ wget http://prdownloads.sourceforge.net/netatalk/netatalk-3.1.11.tar.gz
$ tar -xf netatalk-3.1.11.tar.gz $ cd netatalk-3.1.11
$ ./configure \
  --with-init-style=debian-systemd \
  --without-libevent \
  --without-tdb \
  --with-cracklib \
  --enable-krbV-uam \
  --with-pam-confdir=/etc/pam.d \
  --with-dbus-daemon=/usr/bin/dbus-daemon \
  --with-dbus-sysconf-dir=/etc/dbus-1/system.d \
  --with-tracker-pkgconfig-version=1.0

$ make
$ sudo make install
$ netatalk -V
If that latest command succeeds, you got it! ???? Last part is to configure Netatalk. We are going to edit three configuration files.
First, make sure that the content of /etc/nsswitch.conf is like this:
# /etc/nsswitch.conf Example configuration of GNU Name Service Switch functionality. If you have the glibc-doc-reference' andinfo' packages installed, try: `info libc "Name Service Switch"' for information about this file.

passwd: compat
group: compat
shadow: compat
gshadow: files
hosts: files mdns4_minimal [NOTFOUND=return] dns mdns4 mdns
networks: files
protocols: db files
services: db files
ethers: db files
rpc: db files
netgroup: nis
Secondly, edit /etc/avahi/services/afpd.service with your editor. It’s content should be:
<?xml version="1.0" encoding="UTF-8"?>
<!--*-nxml-*-->
<!DOCTYPE service-group SYSTEM "avahi-service.dtd">
<service-group>
   <name replace-wildcards="yes">%h</name>
   <service>
      <type>_afpovertcp._tcp</type>
      <port>548</port>
   </service>
   <service>
      <type>_device-info._tcp</type>
      <port>0</port>
      <txt-record>model=TimeCapsule</txt-record>
   </service>
</service-group>
Final step on the RPi, we are almost there… Edit /usr/local/etc/afp.conf.
[Global]
     mimic model = TimeCapsule6,106
[Homes Time Machine]
     path = /media/tm
     time machine = yes
I choose the name Homes Time Machine, but of course you can use any other.
On your Mac
We only have to do one thing on our Mac, and that is to execute this command on the terminal:
defaults write com.apple.systempreferences TMShowUnsupportedNetworkVolumes 1
After running this command, head to your Time Machine preferences. Once there, go to Select Disk, your NAS should be selectable:
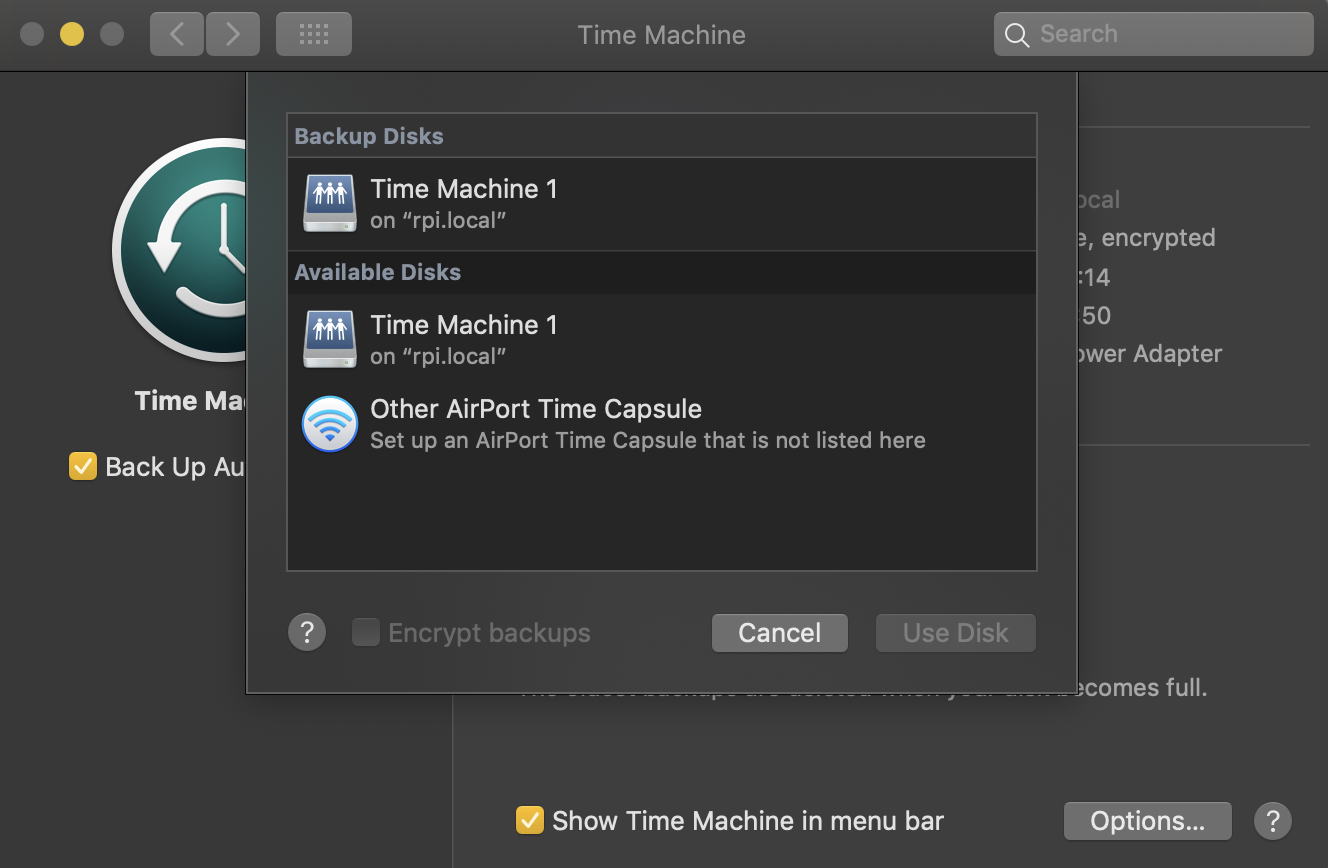
After that, the first backup should complete. It will probably take a long time (4+ hours). My advice is to leave your Mac plugged overnight, with the screen off, and to check the next morning. After that, new backups are incremental, hence small in size and much faster.
Give your self a pat in the back, your Mac will now back up on its own at everyone opportunity it gets on your NAS.
Final note
Take a look at this How To Geek guide: https://www.howtogeek.com/276468/how-to-use-a-raspberry-pi-as-a-networked-time-machine-drive-for-your-mac/. I used them as reference for things like compiling Netatalk. However, in their article, the go down the route of formatting the drive as HFS+, something that in my experience doesn’t work long term.
Also, very important that if you plan to run this 24/7, as I do, I can’t recommend enough getting a USB Power Hub with an external power supply. Hard drives have high peak demands that the RPi will most likely not be able to meet, with its simple power control unit, this will lead to a courrupt file system.